Asset Inventory Form 1
Note: The role of the logged-in user must have access to the Asset Inventory feature in order to perform an asset inventory count in the IntelliTrack Mobile application.
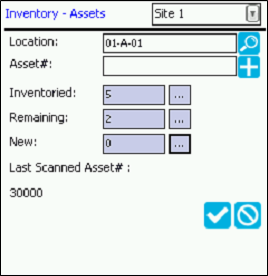
Inventory-Assets Form 1 is set at the User Preferences form; see "Asset Inventory" for more information. With Form 1, you may perform the inventory for an entire location at once on both new and existing assets. The steps below outline how to perform an asset inventory count with Form 1.
- Select Inventory > Assets from the main form.
- The Inventory - Assets form appears.
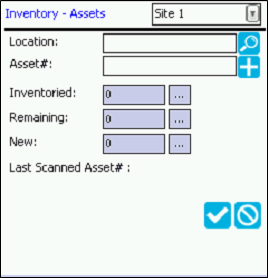
- The default site of the logged-in user is automatically displayed in the site field along the top of the form. An asset inventory may be performed for a location at this site. If the logged-in user has access to another site, it will be available in the site drop-down list and may be selected.
- To perform an asset inventory count for a location at the selected site, scan or enter a valid location in the Location field.
- Search icon: tap the search icon
 to find the assets in this location; they are then added to the count in the Remaining field.
- Search icon: tap the search icon
- Asset # field: enter the asset number in this field.
- Add icon: tap the Add icon to add it to the asset inventory count.
- If this asset is part of the asset list, it will be placed in the Inventoried Assets list; the Remaining field will decrease by one and the Inventoried field will increase by one.
- If this asset is not found in this location, it will be added to the new asset list and the New field will increase by one.

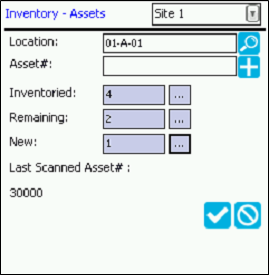
- You are able to view the inventoried assets, remaining assets, and new assets that pertain to this inventory session, by tapping the browse button (...) to the right of the respective fields.
- Inventoried Assets: To view any inventoried assets, tap the browse button (...) to the right of the Inventoried field to reach the Inventoried Assets form. This is a view-only form that lists the assets that have been added to this location during this asset inventory session.
- Remaining Assets: To view any remaining assets, tap the browse button (...) to the right of the Remaining field to reach the Remaining Assets form. This is a view-only form that lists the assets that are currently part of the inventory at this location, but have not yet been scanned/inventoried to the location during this asset inventory session.
- New Assets: To view any new assets, tap the browse button (...) to the right of the New field to reach the New Assets form. This form lists any new assets that have been added to the inventory at this location during this asset inventory session. Action is required at this form to add these assets to the inventoried asset list.
Important: Any NEW assets that are scanned during this inventory session must be added to the asset inventory for this location. You must perform this step in order to add the assets to the inventoried asset list at this location. Otherwise, they will not be part of the saved asset inventory count.
- New Assets Form: If the New field contains a count, the assets need to be added to this location. Tap the browse button (...) to reach the New Assets form, from there the assets may be added to the location.
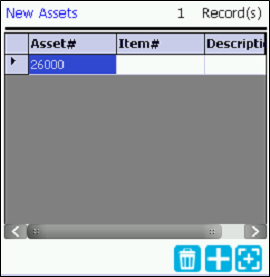
- Delete icon
 (New Assets form): Delete the selected asset press to delete the selected asset.
 - Add icon
 (New Assets form): Add the selected asset select to add the selected asset.
 - Add All icon
 (New Assets form): Add all assets select to add all assets.
 - The user is prompted to add the asset to this location by the following prompt: Add selected asset to inventory?.
- To add this asset to this location, select Yes. (If you do not want to add this asset to this location, select No to return to the New Assets form. )
- If this asset is found, it is added to this location and removed from the new assets count. It is added to the inventoried assets count.
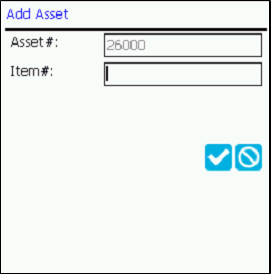
- If this asset is not found another prompt appears: Asset does not exist. Add new? To add this asset, select Yes. (If you do not want to add this asset, select No to return to the New Assets form.)
- If you select Yes, the Add Asset form appears.

- At the Add Asset form, add this asset to an item. Enter the Item # to which this asset is being added to in the Item # field (This item must be an asset-type item. If it is not, a message Invalid Item appears and it will not be accepted in this field.)
- If this asset item uses RFID, the RFID Tag Number field appears; optionally you may enter an asset RFID tag number in this field.
- Next, select the Save button to close the Add Asset form and add this asset. (If you do not want to add this asset, click the Cancel button to close the Add Asset form without adding the asset.) The user is returned to the New Assets form. The asset has been added to this location.
- When the user has processed all of the new assets, the new asset list at the New Assets form will be empty.
- To add this asset to this location, select Yes. (If you do not want to add this asset to this location, select No to return to the New Assets form. )
- Close the New Assets form by tapping the Windows close icon (X) or the ok icon found in the top right corner of the page.
- The Inventory - Assets form appears.
- If you have counted all of the assets at this location and added them to the list of inventoried assets, you are ready to save this inventoried count to this location. Tap the Save button found in the bottom right area of the form to add these assets to this location. The form clears, indicating that the system is ready to perform another asset count.